
Change Taskbar Preview Thumbnail Size in Windows 10
In Windows 10, when you hover over a taskbar button of a running app or group of apps, a thumbnail preview appears on the screen. For a single window it shows a single thumbnail, and for multiple windows it shows a number of thumbnail previews in a row. If you wish to enlarge or decrease these thumbnails in Windows 10, I will explain how it can be done with a simple Registry tweak.
As you may be aware, Windows 7 introduced a redesigned taskbar which abandoned much loved classic features but introduced some nice improvements like large icons, jump lists, draggable buttons etc. Windows 10 comes with the same taskbar. It does not have many configurable settings exposed in the GUI to tweak its behavior but there are some hidden secret Registry settings which you can fine-tune. In this article, we will see how to change the taskbar thumbnail hover delay in Windows 10.
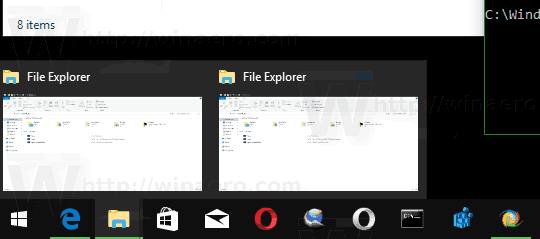
When you hover over the taskbar button of an open app, it will show you a small thumbnail preview of its window. See the following screenshot:
It is possible to adjust the size of these thumbnails. Here is how.
To change the taskbar preview thumbnail size in Windows 10, do the following:
- Open Registry Editor.
- Go to the following Registry key:
HKEY_CURRENT_USER\SOFTWARE\Microsoft\Windows\CurrentVersion\Explorer\Taskband
Tip: You can access any desired Registry key with one click.
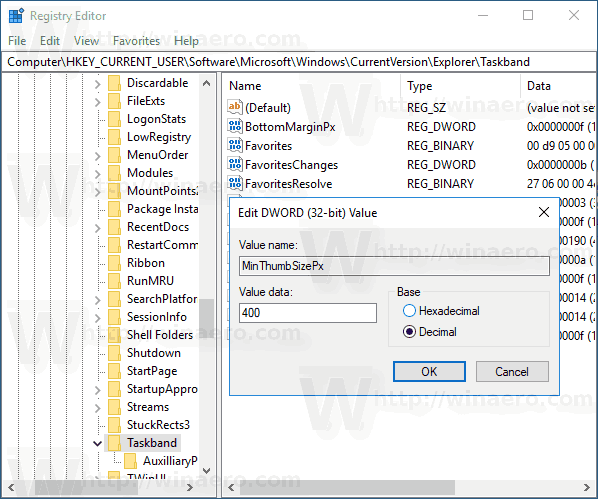
- Here, modify or create a new 32-bit DWORD value namedMinThumbSizePx. Note: If you are running 64-bit Windows 10, you still need to create a 32-bit DWORD.
- Set its value data in decimals to the number of pixels you want for the size of taskbar thumbnail previews. For example, you can set it to 400 pixels as shown below.
- Modify or create the MaxThumbSizePx 32-bit DWORD value and set it to the same value.
- Restart the Explorer shell or sign out and sign in back to Windows 10.
This will change the taskbar preview thumbnail size in Windows 10. See screenshots below.
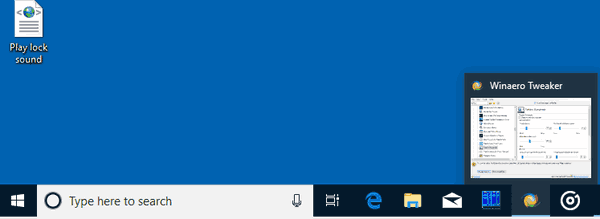
Before:
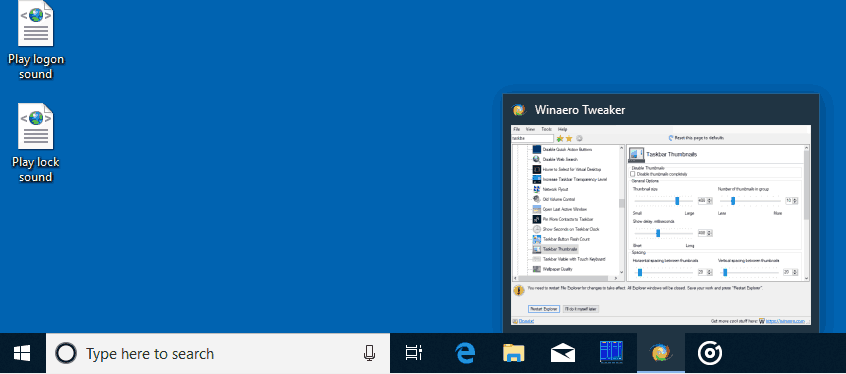
After:
You are done.
To restore the defaults, just delete the above mentioned MinThumbSizePx and ManThumbSizePx values. Don't forget to restart the Explorer shell.
coreldraw 2020 initializing stuck
HKEY_LOCAL_MACHINE\SOFTWARE\Corel\CorelDRAW\22.0\IPM_CDGS
showEULA 0
Pasang Playstore Di HG680-P
Pasang Playstore Di HG680-P
Bahan yang diperlukan :
- Download "NanoDroid MicroG" terbaru dari situs Nanolx disini
- Download TWRP311.zip
- Download microg-framework.jar.zip
- SD Card
- Mouse (buat jalanin TWRP)
Tahapan I :
- Taruh kedua berkas tersebut di SD Card, lalu masukan ke STB
- Koneksikan STB ke PC via ADB Wifi adb connect ip-stb atau gunakan Android Terminal Emulator
- Reboot ke mode recovery adb reboot recovery atau reboot recovery kalau menggunakan Terminal
- Di mode recovery, pilih menu Apply update from EXT
- Pilih Update from sdcard
- Pilih TWRP311.zip, tunggu sampai TWRP selesai dimuat
- Di TWRP, masuk ke menu Install menggunakan mouse
- Pilih paket NanoDroid-microG-xxxxxxx.zip, lalu konfirmasi pemasangan (geser kanan menggunakan mouse)
- Kembali menu Install, pilih paket microg-framework.jar.zip, lalu konfirmasi pemasangan
- Lakukan reboot ke sistem setelah instalasi
Tahapan II :
- Buka aplikasi MicroG Services Core
- Buka menu Self-Check menggunakan mouse
- Centang di bagian System grants signature spoofing permission
- Nanti muncul Pop-Up, konfirmasi pemberian izin kepada microG Services Core
- Klik panah back dikiri atas, aktifkan Google device registration
- Klik panah back dikiri atas, aktifkan Google Cloud Messaging
- Klik panah back dikiri atas, aktifkan Google SafetyNet
- Klik panah back dikiri atas, masuk ke menu UnifiedNlp Settings, lalu aktifkan Deja Vu Location Service, beri centang Configure location backends terus OKE
- Nanti muncul Pop-Up, konfirmasi pemberian izin kepada Deja Vu Location Service
- Aktifkan juga Nominatim dengan memberi centang di bagian Configure address lookup backends, terus OKE
- Buka pengaturan STB, lalu buka pengaturan tambahan
- Buka menu More Settings di bagian Preferensi
- Scroll ke bawah, buka pengaturan Lokasi
- Ubah mode lokasi ke Akurasi Tinggi
- Klik panah back dikiri atas, pilih menu Aplikasi
- Scroll ke bawah, buka Google Play Store
- Buka menu Izin Google Play Store
- Buka menu Izin tambahan
- Aktifkan izin Spoof package signature
- Matikan dan hidupkan STB
- Buka aplikasi Google Play Store
- Tekan tombol SIGN IN di pojok kanan bawah
- Tunggu sampai halaman sign in muncul
- Lakukan sign in dengan akun google seperti biasa
- Tunggu sampai proses sign in selesai
- Play Store sudah bisa dipakai
Take Ownership a folder
Change ownership recursively:
To change the ownership of a folder, its subfolders, and files in each subfolder, use this syntax:
takeown /f <foldername> /r /d y
The currently logged on user is now the owner of the folder.
To set Administrators group the owner of the folder, its subfolders, and files recursively, use the /A switch in addition:
TAKEOWN /F <foldername> /a /r /d y
/RRecurse: instructs the tool to operate on files in the specified directory and all subdirectories./Dprompt Default answer used when the current user does not have the “list folder” permission on a directory. This occurs while operating recursively (/R) on sub-directories. Valid values “Y” to take ownership or “N” to skip.
Assign Folder Permissions
Then to assign the Administrators group Full Control Permissions for the folder, use this syntax:
icacls <foldername> /grant administrators:F /T
The /T parameter is added so that the operation is carried out through all the sub-directories and files within that folder.
Error 0xc0000005
Error 0xc0000005: the application was unable to start
This situation is no less common than the first one.
So, where should you start?
- 1. As in case 1, you should check for viruses at the beginning. Perhaps that is the root of your problem!
- 2. Fix registry.
You can resolve the 0xc0000005 in Windows error by fixing the registry errors.
Pay attention! Fixing the registry is not a simple action on your computer. Doing in wrong may lead to severe damage of your files! So, if you can, use the backed up version of your registry files to solve the problem. If you don’t have backups of your registry files, you need to create them before you do anything to them!
Corrupt registry files can lead to a ton of errors in Windows, and the 0xc0000005 error is one of them. To fix error code 0xc0000005, you need to perform these steps:
- Press Win + R to open Run window and type ‘regedit’. Hit Enter.

- In the registry, you need to follow this path: HKEY_LOCAL_MACHINE\SOFTWARE\Microsoft\Windows NT\CurrentVersion\Windows\LoadAppInit_DLLs

- Double-click on LoadAppInit_DLLS (REG_DWORD file type) and change values from 0 to 1.

- Click on OK and confirm the changes. Reboot the system.
Print Spooler not start

Print Spooler will not just stop for any reason.
The print spooler is set up to restart 5 times after a failure. If the spooler continues to fail, there is an underlying issue causing it to fail.
Go to: c:\windows\system32\spool\printers
Delete all files inside this folder.
Try and restart the spooler and monitor the event log to see if it is still failing.
If it is still failing, the issue is a corrupt printer driver.
Go to: c:\windows\system32\spool\drivers
If your OS is 32 Bit go to : W32X86
If your OS is 64 bit go to : x64
*WARNING - THIS WILL DELETE ALL INSTALLED PRINTERS*
Delete all files in this folder and reinstall your printer.
How to install apps from external sources in your smart android TV
How to install apps from external sources in your smart android TV
Nothing is as frustrating as having to contend with the restrictive app stores in most of the smart TVs. Most of the application managers have very limited apps in their stores and lack the most sought after apps like Netflix, YouTube, and Spotify etc. In this tutorial, we are going to discuss how to install these apps from external sources.
Prerequisite
This tutorial will require the following items:
- Android smart TV (Any brand can do)
- Android smartphone (Any make can do)
- ES File Explorer
- Network connection preferable Wi-Fi
Install ES File Explorer File Manager
The first step is to install ES File Explorer from your favourite app store. The recommended one is the Google Play Store.
- Download and install Google Play store (comes preinstalled in most android phones)
- Search for ES File Explorer File Manager
- Install the app
.jpeg)
Network Connection
Ensure both Smart Tv and the smartphone are connected to the same network preferably a Wi-Fi connection.
Install ES File Explorer File Manager in the Smart TV
The next step is to install ES File Explorer File Manager on the Smart TV. To achieve this, follow the steps below:
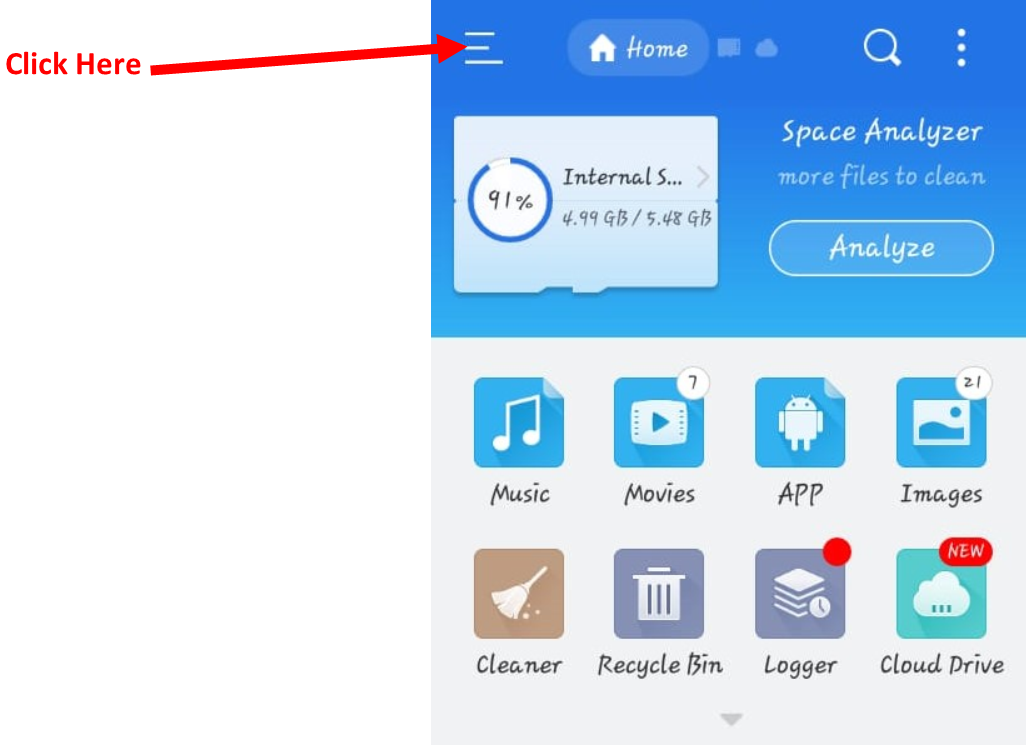
- Open ES File Explorer installed on the smartphone.
- Press the menu on the top left corner. Open a side menu.
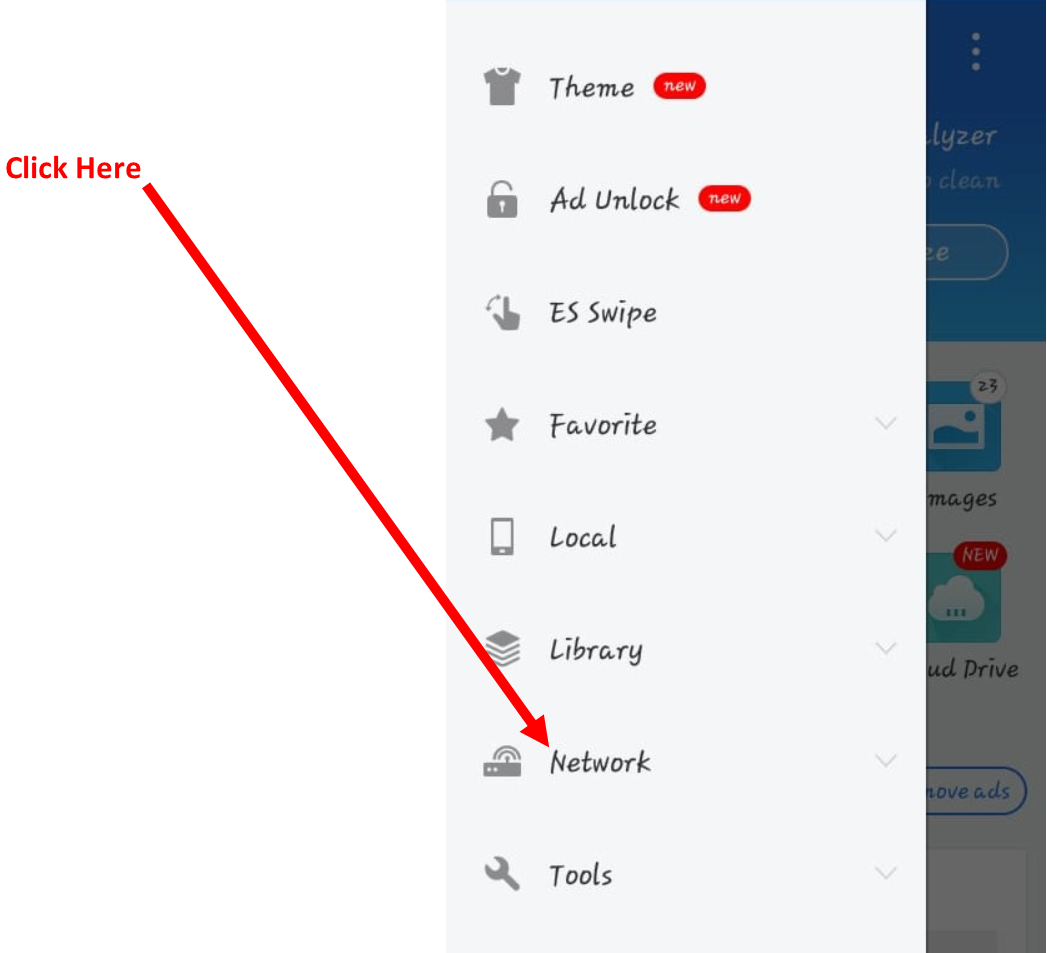
3. Navigate to the Network Menu
4. Click on the dropdown and select Android TV. Loads a new window.
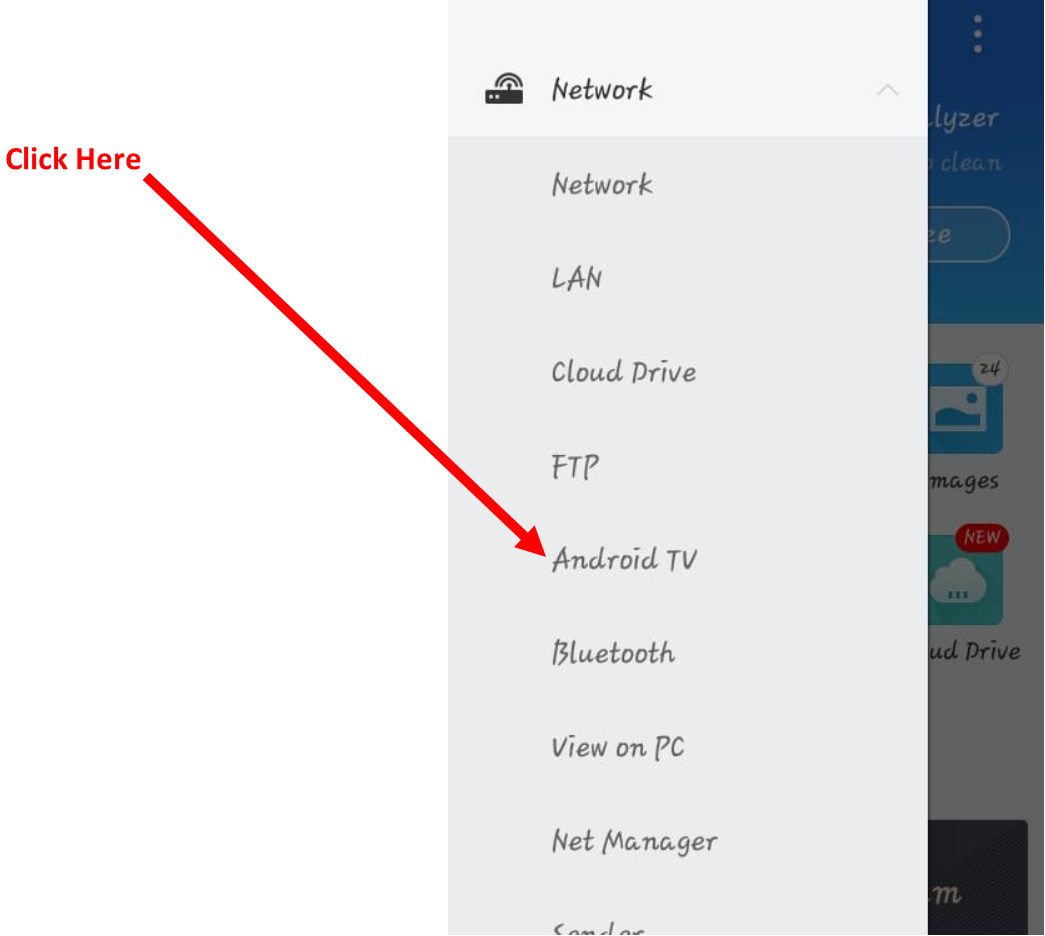
5. Click on Scan button. The app will scan for available devices and load them in the list.
6. Select your Smart TV from the list (in most cases, it usually the only item listed in the menu).
.jpeg)
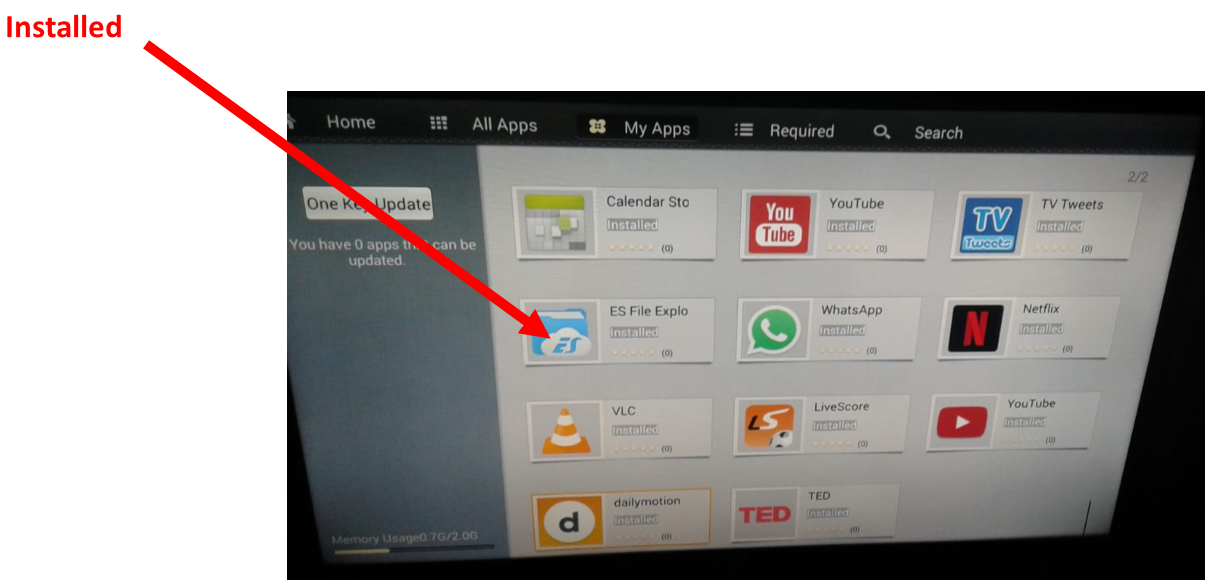
8. ES File Explorer will be automatically installed on your Smart Tv. To confirm installation, go to the application manager in your Smart TV and navigate to the list of installed apps. ES File Explorer should be one of the apps.
Install App Of Choice
Finally, you can install the application of choice. There are three methods that can be used to install an app into your smart TV now that ES File Explorer File Manager is already installed.
Method One: using a smartphone
For this method to work. You have to ensure that the smartphone and the smart TV are still in the same network then follow the steps below:
- Install the app on your smartphone.
- Open ES File Explorer File Manager and click on APP menu. A new window with a list of the apps installed on the smartphone will show.
- Long press on the app you have just installed and click More
- Select Install To Tv from the menu that pops up.
- Wait for the app to be installed in the Smart TV.
.jpeg)
Method Two: Using removable devices
- Download the apk file for the application you want to install
- Copy it to an external device and insert the external device (flash disk, memory stick or any other device your smart TV can read) to the smart TV.
- Open ES File Explorer File Manager in your smart TV and navigate to the apk in your external device.
- Click it and select install.
Method Three: Using Google Play Store
Assuming that the app you want to install can be found in the Google Play store.
- Install Google Play Store into your smart TV using either method one or two.
- Open google play store.
- Search for the app you want and install it your Smart TV just the way you normally do it on your smartphone.
Whichever method you decide to use, the app of choice should be installed on your smart TV.
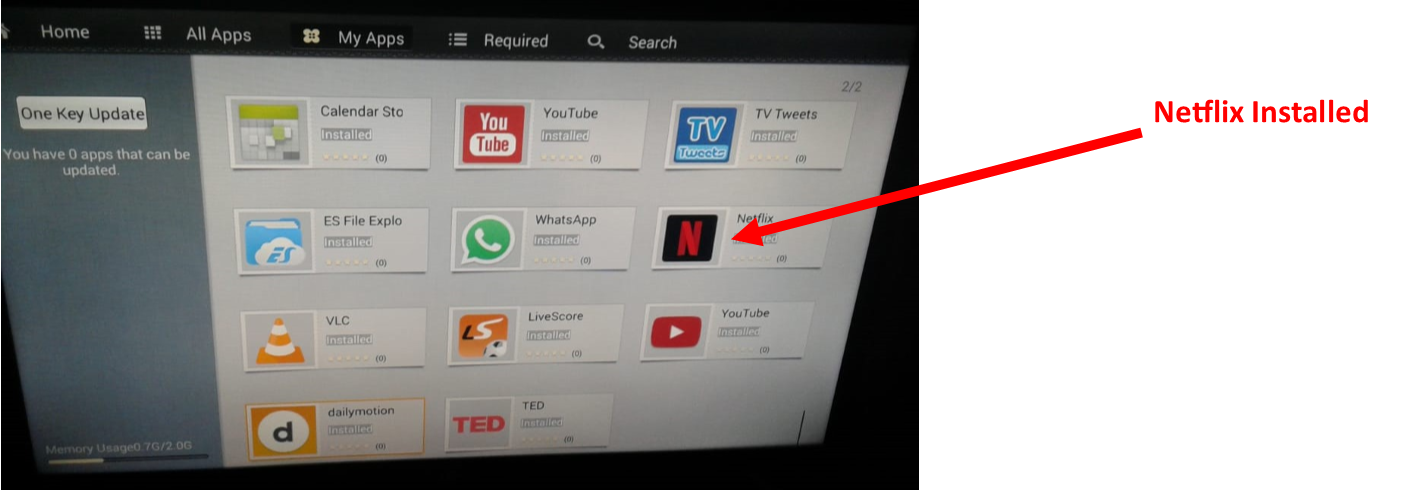
That’s it.
Bluetooth Missing Send A File, Receive A File Menus
Windows : Bluetooth Missing Send A File, Receive A File Menus
You all are aware with the functioning of the Bluetooth. You can easily move files via Bluetooth from one device to another Bluetooth compatible device. My personal experience is very bad in connection with Bluetooth. Many a times I had faced transfer problems in Bluetooth. After a small research, I found out that the problem in the transaction might be because of the old Bluetooth driver running on my PC. But my last problem with Bluetooth was totally different.
I was facing problem in sending and receiving the files through Bluetooth wizard. Bluetooth icon is very much present on the Notification Area of the Taskbar. So when you right click on it, among many options, send a file and receive a file are the two main options required for a successful transaction. And, unfortunately, Bluetooth Missing Send A File, Receive A File Menus in my Windows 10 laptop. Well, you can repair this problem by updating the Bluetooth driver or reinstalling it. In case, both the methods do not work for you, you can try the below method.Bluetooth Missing Send A File, Receive A File Menus

How to Fix Missing Menus Send a File and Receive a File of Bluetooth on Windows 10
- At first Update Bluetooth driver through device manager.
- If it doesn’t work uninstall the driver and restart your PC. If the problem is still not fixed, act according to the underneath process.
- The combination of Windows including R keys will uncover the Run command on the screen. So hit the two keys jointly at a time.
- Type regedit on the text space provided.
- Click Ok to go to the next step.

- User Account Control manifests on screen.
- Move off with Yes and admit the machine to unfold Registry Editor console.
- Follow the underneath path on the left pane of the Registry Editor
HKEY_LOCAL_MACHINE -> SYSTEM -> CurrentControlSet -> Services -> BTHPORT -> Parameters
- On the right pane of the window look for the DWORD named as DisableFsquirt whose value is set as 1.
- Right click on that DWORD and select the option Delete.

- Move off along with Yes which leads to Confirm Value Delete.

- Exit Registry Editor.
- Further, you will have to play with command prompt. Streamline it.
- Copy the houndish command followed by a paste into it then after hit Enter.
fsquirt.exe –register
- Restart your machine and observe the results. The missing options will be back.
Subscribe to:
Posts (Atom)